Mastering Screen Captures: The Essential Guide to Snipping Tool Keyboard Shortcut
Introduction
Do you want to increase your productivity and efficiency while using your computer? Keyboard shortcuts are the answer. They allow you to perform tasks rapidly and without the need to navigate through various menus. One such invaluable shortcut is the Snipping Tool Keyboard Shortcut. This guide will enlighten you on its importance, functionality, setup, and how to troubleshoot common issues.
Why Use Keyboard Shortcuts like the Snipping Tool?
Keyboard shortcuts, such as the Snipping Tool offer distinctive benefits for computer users seeking to reduce dependency on mouse navigation and enhance productivity. Let's explore the advantages:
1. Accelerated Productivity: Shortcuts eliminate the need to dig through multiple levels of menus, allowing you to execute commands swiftly and shave off precious seconds from repetitive tasks.
2. Precision: The Snipping Tool brings precision in capturing entire screens or particular screen segments which would be tough to achieve with a standard cursor.
3. Versatility: Beyond taking screenshots, the Snipping Tool permits annotations, saving, and sharing of captured images without the requirement for extra software.
The Snipping Tool and its keyboard shortcut make screen capturing a breeze, saving valuable time and minimizing interruptions in the workflow, hence, providing an effective route for both professional and personal tasks.
What is the Snipping Tool and Its Functionality?
The Snipping Tool is a utility that comes by default on computers that operate on the Windows platform. It is designed specifically for screen-capturing activities. This tool is multi-faceted, offering various screen capture types, additional features for increased convenience, and user-friendly interfaces. But what exactly does the Snipping Tool do? Let's break it down.
- Primary Function: The Snipping Tool's main purpose is enabling quick and effortless screenshot captures of any visible content on your computer screen.
- Capturing Modes: With the Snipping Tool, you can capture in four different modes for tailored capturing experience.
- Full-screen Snip: Captures the entire screen. Ideal for capturing full-page content.
- Free-form Snip: Allows you to freely draw the area to be captured. Best suited for capturing irregular shapes.
- Window Snip: Captures specific windows or dialog boxes. Useful for tutorials or troubleshooting guides.
- Rectangular Snip: Captures a rectangular part of the screen. Perfect for capturing specific sections of content.
- Additional Features: Besides its capturing modes, the Snipping Tool exhibits features like a delay capture function, which permits you to take scheduled screenshots. Furthermore, it provides options to annotate, save, and even share your snips seamlessly without having to switch between different software.
Overall, the Snipping Tool goes beyond being a mere screen capturing tool. It empowers users with diverse modes and features that cater to different capturing scenarios, making it an indispensable tool in one's digital arsenal.
So, What is the Keyboard Shortcut for Snipping Tool?
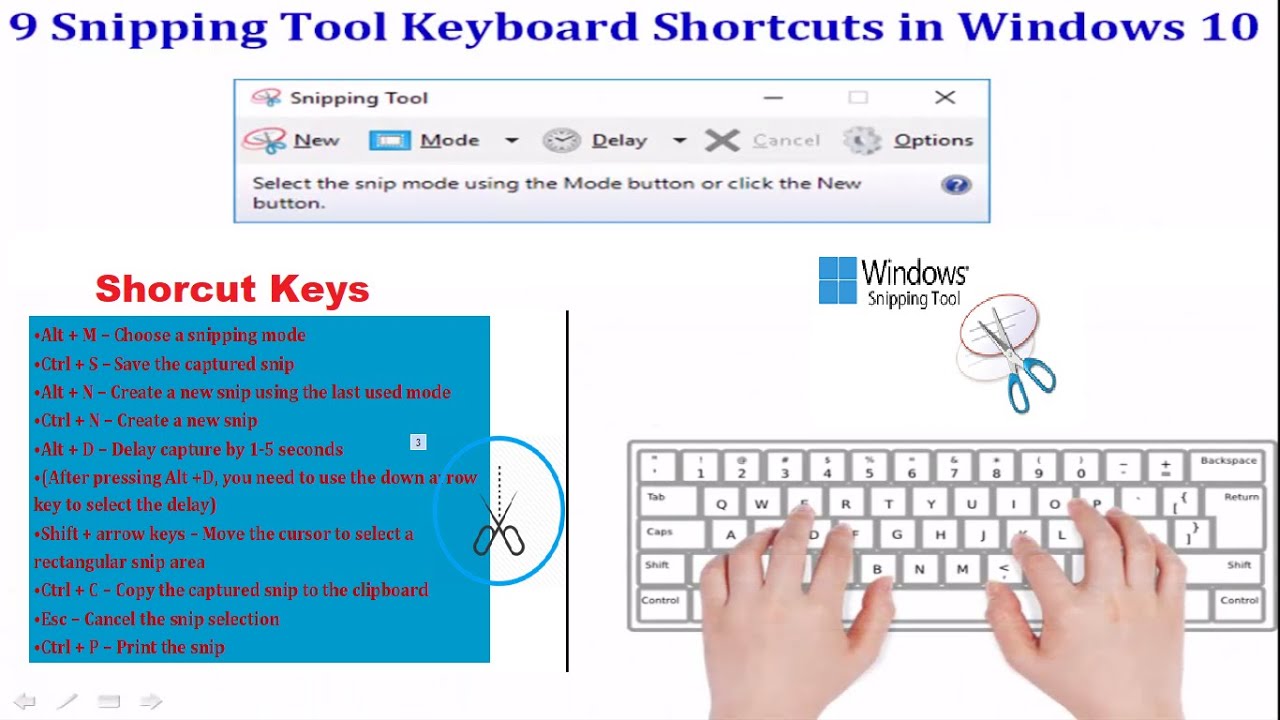
Are you curious about the keyboard shortcut for the snipping tool? This is particularly handy for those who regularly need to take quick screenshots for numerous purposes such as presentations, reports, or simply sharing information. The basic keyboard shortcut, as well as its functionality and process, are designed for simplicity and accessibility.
First things first:
• The Primary Snipping Tool Shortcut - The default keyboard combination to activate the Snipping Tool on Windows systems is pressing the ‘Windows Logo key’, 'Shift', and ‘S’ all at once. This effortless method of initiation is what makes this tool incredibly user-friendly and efficient.
Once you have hit these keys, you will see significant changes on your screen:
• Screen Change - The screen will appear faded, serving as an indication for you to select and capture a specific region on your screen.
The next steps involve the capture action:
• Command Execution - The space you want to capture can be selected by holding your mouse button and dragging it over the area you want to capture. This could be a small segment or the entire screen.
• Capture Completion - Upon releasing the mouse, the captured image will be copied and saved to your clipboard corresponding to your selection.
The final steps encapsulate the usage aspect:
• Using the Captured Image - You can then paste this saved screenshot in any application of your choice - Word, Paint, or an email - to utilize it as needed.
The quick and easy image capture process provided by the snipping tool keyboard shortcut makes it an indispensable tool for everyday computer usage.
How Can You Customize and Set Up the Snipping Tool Keyboard Shortcut?
The standard keyboard shortcut for the Snipping Tool effectively serves its purpose. However, personalizing it to align with your comfort, can further expedite your tasks. A tailor-made shortcut feels more intuitive and turns into a force of habit sooner. Here's an easy-to-follow step-by-step guide to customizing the Snipping Tool keyboard shortcut:
1. Find the Snipping Tool: Start by finding the Snipping Tool on your PC. This can commonly be found in the 'Windows Accessories' folder in the 'Start' menu.
2. Access Properties: Once you locate the Snipping Tool, right-click on the application. A pop-up menu will be displayed. Proceed to select the 'Properties' option from this menu.
3. Shortcut Tab: Now, you'll be presented with a dialog box displaying various properties. Among the multiple tabs on the top of the box, select the one labeled 'Shortcut'.
4. Designate Shortcut Key: Having navigated to the 'Shortcut' tab, you should see 'Shortcut Key'. The box adjacent to this will currently display 'None'. Click on this box and enter your preferred combination of keys for the shortcut.
5. Apply Your Change: You're almost done setting up your new shortcut. To finalize and save your changes, simply click on the 'Apply' button at the bottom of the dialog box.
6. Success!: You should now see the key combination you entered in the 'Shortcut Key' box. Click 'OK' and voila, you've successfully customized the Snipping Tool keyboard shortcut.
Remember, the Snipping Tool and its keyboard shortcut are there to ease and streamline your operations. So, ensuring that it's as friendly and intuitive as possible is a step towards enhanced productivity. Your personalized shortcut can now speed up your screenshot process, bringing you closer to mastering time-efficient computer usage. Enjoy using the Snipping Tool - your way!
Exploring Common Issues and Solutions with Snipping Tool Keyboard Shortcut
Like any other digital tool, the Snipping Tool isn't immune to occasional issues. While highly reliable, challenges may arise, especially regarding its keyboard shortcut functionality. Users sometimes report that the shortcut fails to respond, which could be caused by software conflicts or pending Windows updates. To ensure a smooth workflow, understanding these issues and knowing how to resolve them is crucial.
- Problem - Snipping Tool Keyboard Shortcut Not Working:
This is one of the most common issues experienced by users. If your Snipping Tool keyboard shortcut isn't working, it is generally due to software conflicts or Windows updates.
- Solution:
1. *Installing the Latest Windows Updates* - Check whether your Windows is updated to the most recent version, as updates often contain bug fixes and improvements essential for the smooth functioning of pre-installed tools like Snipping Tool.
2. *Background Software Conflicts* - If you have ruled out Windows updates as the cause, software conflicts may be at play. Identify any recent software installed that may cause a conflict and disable them temporarily to check if the shortcut works.
- Problem – Shortcut Opening the Wrong Tool:
Another issue reported by users is the shortcut opening the wrong tool instead of the Snipping Tool.
- Solution:
1. *Checking Shortcut Assignments* - It is possible that the same shortcut is assigned to another tool. Go to the properties of each newly installed software and check if the same shortcut has been assigned.
2. *Windows Support and Forums* - If the issue persists, despite applying the above steps, consider reaching out to Windows Support or look for solutions in Windows forums. There's a strong chance that another user has encountered the same problem and has a solution.
Understanding the common hurdles and solutions related to the Snipping Tool keyboard shortcut allows you to operate the tool smoothly and effectively, ensuring productivity is not hampered. With the right know-how, troubleshooting becomes easier, and the journey to screen capture mastery becomes attainable.
Conclusion
Mastering the Snipping Tool and its keyboard shortcut is an invaluable skill, especially if you frequently work with screenshots. Not only does it speed up your work process, but it also promotes a smoother work flow. However, remember that like any other tool, understanding its functionality is key to unlock its full potential. So, get ready to conquer the world of screen captures with newfound knowledge and skills!
Related FAQs about what is the keyboard shortcut for snipping tool
What are some other beneficial keyboard shortcuts besides the snipping tool?
There are several beneficial keyboard shortcuts that can increase productivity, including Ctrl+C for copy, Ctrl+V for paste, Alt+Tab for switching between applications, Ctrl+S for saving a document, and Ctrl+P for print. Familiarising yourself with such shortcuts can drastically enhance your work efficiency.
How can keyboard shortcuts enhance my productivity in day-to-day tasks?
Keyboard shortcuts can significantly enhance your productivity by saving time and effort. Instead of navigating through various menus, you can perform tasks quickly, enabling a smoother and faster workflow. This can be especially beneficial during tasks that require repetitive actions.
What if the Snipping Tool keyboard shortcut doesn’t work?
If the Snipping Tool shortcut isn't working, check for the latest Windows updates and install them if needed. If the issue persists, disable recent software/temporarily as they may cause conflicts. If all else fails, seek assistance from Windows Support or participate in Windows forums.


